Slide.Show and SharePoint: Part II - Getting the data
This is a multi-part series. The other parts can be found at
- Slide.Show and SharePoint: Part I – Configuring Slide.Show
- Slide.Show and SharePoint: Part III – Deploy and final config
In part I we focused on getting Slide.Show to work with the content editor web part (CEWP), now the next step is getting the image information out of of the picture library so Slide.Show can display it. The first point you’ll need to understand is how Slide.Show knows where to find the images. It does it with a DataProvider, which is really a XML file reader. In the default configuration it looks for a file in same directory as the configuration file named Data.XML for the information, but it can be overridden with a custom DataProvider, like the Flickr one which was used in the last step of part I. Unfortunately there is no SharePoint data provider yet so we need to either roll our own version or provide the SharePoint data in a format Slide.Show can work with natively. Both require development but I prefer the second option because it means that I am not investing massively into Slide.Show, rather I am investing my time into a tool to get the data out and then a small bit of time into formatting it for Slide.Show. The advantage of this means that should a better solution come along in the future I can easily change the formatting part and have it work with the newer system. The other advantage of the second option is a personal one, because I prefer C# development (which I will build the provider in) with all of Visual Studio’s helping and documentation to JavaScript development (which is what would have to be used for the DataProvider).
The XML format which Slide.Show requires is something like this:
1: <data>
2: <album ...>
3: <slide .../>
4: <slide .../>
5: <slide .../>
6: ...
7: </album>
8: </data>
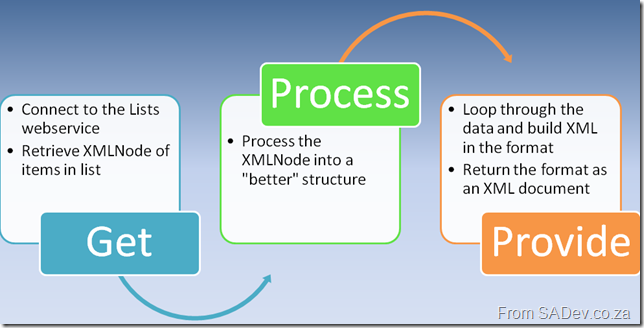
SharePoint won’t give the data to us in the format so to solve this I wrote an ASP.NET page does the following:
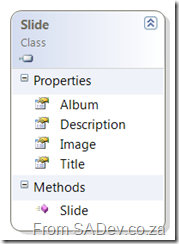
The Get stage is fairly logical in that we connect to the Lists web service in SharePoint and using the GetListItems method we retrieve the items from the list which returns as an XMLNode, which is not the easiest way to work for two reasons. Firstly SharePoint has a lot of namespaces so using XPath to extract the items is tricky and annoying, but thankfully John Wood did post a nice way to work with the XMLNamespaceManager which I use. The second reason comes back to the reason why I am doing this in C# as opposed to a dedicated Slide.Show provider. Once I convert it to easier to work with structure I can do the outputting to various systems a lot quicker. So in this case I created a simple class which contains a few properties to define the slide image and pop that into a List<T>. I am a bit of a List<T> fan boy using it where I can because it is fast and it allows me to use Linq with it easily (yes I know I can use Linq To XML but I prefer the rich integration in VS of Linq to objects and the thought of SharePoint’s XML scares me), and using Linq will allow for some nice features later on.
The last stage Provide is where I take my list of slides and use it to build up an XMLDocument which I will return. The building of the XMLDocument is not rocket science (just a couple of foreach’s really), but the returning it may be of interest to some people so I will just cover that briefly. What I do is drop the PageLoad method of the ASP.NET page and work in the render method which allows me to get into the page life cycle earlier on and control a few more parts of the output using the Response class. There are only two things I really care about, first is Response.ContentType which specifies to the caller (normally your browser but in this case Slide.Show’s DataProvider) what the content is. So we set that to Text/XML. This is one of the first things I do, and then one of the last things I do is send the XMLDocument.OuterXML to the browser using Response.Write. Provided I have done all my stages correctly I should be able to browse to the ASP.NET page and see XML formatted as I wanted it.
Part of building this also means making it reusable so there is a couple of things I did. First off the security is handled using built in Windows Authentication which may be a problem on web facing sites but it does mean that on intranet sites the security of the list items is maintained which is vitally imported. This is easily done by getting the configuration on IIS right (which we will cover in part III) and setting the Lists.UseDefaultCredentials to true. The next two vital configuration items are the URL to the lists web service and the name (or GUID) of the list we want. This is done using mandatory query string parameters (failure to provide them throws an AgrumentException) so your most minimalistic query string would look like this:
http://sharepoint/addon/slideshow.aspx?url=http://sharepoint/site/_vti_bin/lists.asmx&list=Photo%20Gallery
Breaking that down it has the following parts
- http://sharepoint/addon/slideshow.aspx : The URL to the page we have created.
- url=http://sharepoint/site/_vti_bin/lists.asmx : The URL of the lists web service we want to call.
- list=Photo%20Gallery : The name (or GUID) of the picture library.
I have added support for a few extra optional items to the query string as well which allows you to tailor the results:
- view : Used to specify the view name (or GUID) you want returned. Leaving it out returns the default view. Type is a string.
- limit : Used to specify the number of items to return. Default is all items. Type is a integer.
- recurse : Used to specify if you want to recurse into folders or just return the items from the root. Default is to recurse. Type is a boolean.
- group : Used to create Slide.Show albums based on the folders. Default is false. Type is a boolean.
- random : Used to return the items (not albums, if group is true) in a random order. Default is true and type is boolean.
An example of using some of those options would look like this: http://sharepoint/addons/slideshow.aspx?url=http://sharepoint/site/_vti_bin/lists.asmx&list=Photo%20Gallery&group=true&random=false&limit=20
So the default provides all images (regardless of folders) in random order which looks great with the standard Slide.Show settings (lots of images, randomly displaying etc..).
That is the hard part of this, the last part is getting this web application to deploy on the server (some things to be aware of) and configuring Slide.Show to use it, which is surprisingly easy.
WSS and audience targeting
If you follow Willy’s blog you would have seen a post mentioning I have been a busy little person recently (if you hadn’t see it you can go here to read it). One of the things about SAArchitect.net is that it does not run on the big boys edition of SharePoint, it actually runs on WSS. However the thing people commonly forget about WSS is that it actually can do everything it’s brother can do, it just does not have all the templates and the fiddly bits out of the box. This means the time/cost/pain to get to the same point as it’s brother is a bit/minor/average/excessively more. One of the fiddly little bits which is missing, is audience targeting. Which I think is super sexy for public web sites, especially when you want to show different things to users who have logged in or and those who haven’t. An example is on the new SAArchitect site when you are logged in it should let you change your password and if you aren’t logged in then it should let you apply or request a forgotten password.
So putting my developer cap on (or at least adjusting it since it doesn’t ever come off) I fired up my trusty copy of Visual Studio. I needed VS as I had decided to solve this using ASP.NET and a web part which does come with WSS, the Content Editor Web Part (CEWP). Utilizing all of the power of Visual Studio 2008, I toiled away to produce my ASP.NET page with a staggering 22 lines of code which looks something like this:
Note: All the code is available in the file at the end of this post.
1: <%@ Page Language="C#" ContentType="text/xml" %>
2:
3: <%@ Import Namespace="System" %>
4: <%@ Import Namespace="System.Globalization" %>
5: <%@ Import Namespace="System.Web.UI" %>
6: <script language="C#" runat="server">
7: protected override void OnPreRender(EventArgs e)
8: {
9: string result = string.Empty;
10: if (Page.User.Identity.IsAuthenticated)
11: {
12: result = String.Format(CultureInfo.CurrentCulture, "<?xml version=\"1.0\" encoding=\"utf-8\" ?>" +
13: "<user xmlns=\"http://schemas.saarchitect.net/ajax/2008/09/user\" username=\"{0}\" />", Page.User.Identity.Name);
14: }
15: else
16: {
17: result = "<?xml version=\"1.0\" encoding=\"utf-8\" ?>" +
18: "<user xmlns=\"http://schemas.saarchitect.net/ajax/2008/09/user\" username=\"\" />";
19: }
20: Response.Write(result);
21: }
22: </script>
For those out there looking at that code and thinking it looks a little odd, it could be that the code all goes in the .aspx page itself. No code behind magic or web.configs or app_data folders to weigh this down. At 22 lines of code it’s all very simple: just checking if you are authenticated and if you are it returns an XML fragment with your name in it, and if you aren’t a XML fragment with no name and even a pretty namespace. In reality that could have been smaller like <u a=”0”/> if you aren’t logged in and <u a=”1”/> if you are, but that isn’t very human readable ;) That single file sits on the WSS site in a document library, which is interesting (at least to me) because SharePoint will not let the code run by default as a way of protecting you from security issues. However if you are smart/brave/stupid enough you can tell SharePoint to let you run it, using the SharePoint web.config. Microsoft has a great article on how to do that over there.
Now that I have the code to tell me if I am logged in or not, I need to hide/show content based on it, which is easily done using the source editing options of the CEWP to plop in a bit of JavaScript. This bit of JavaScript uses a XMLHttpRequest to call the ASP.NET page and gets the result, which I check and based on the result show the relevant content as described below:
1: <script type="text/javascript">
2: //Partially from http://www.w3schools.com/XML/xml_http.asp
3: // Partially from http://en.wikipedia.org/wiki/Xmlhttprequest
4: // Provide the XMLHttpRequest class for IE 5.x-6.x:
5: if( typeof XMLHttpRequest == "undefined" ) XMLHttpRequest = function() {
6: try { return new ActiveXObject("Msxml2.XMLHTTP.6.0") } catch(e) {}
7: try { return new ActiveXObject("Msxml2.XMLHTTP.3.0") } catch(e) {}
8: try { return new ActiveXObject("Msxml2.XMLHTTP") } catch(e) {}
9: try { return new ActiveXObject("Microsoft.XMLHTTP") } catch(e) {}
10: throw new Error( "This browser does not support XMLHttpRequest." )
11: };
12:
13:
14: var xmlhttp;
15: function loadXMLDoc(url)
16: {
17: xmlhttp = new XMLHttpRequest();
18:
19: if (xmlhttp != null)
20: {
21: xmlhttp.onreadystatechange=state_Change;
22: xmlhttp.open("GET",url,true);
23: xmlhttp.send(null);
24: }
25: else
26: {
27: alert("Your browser does not support XMLHTTP.");
28: }
29: }
30:
31: function state_Change()
32: {
33: if (xmlhttp.readyState == 4)
34: {// 4 = "loaded"
35: if (xmlhttp.status == 200)
36: {// 200 = OK
37: var username = xmlhttp.responseXML.selectSingleNode('//user').getAttribute('username');
38: if (username.length > 0)
39: {
40: // user logged in
41: document.getElementById('resultText').outerHTML = '<P><A href="/memberPages/changepassword.aspx">Change Password</A></P>';
42: }
43: else
44: {
45: // anonymous
46: document.getElementById('resultText').outerHTML = '<P><A href="/Pages/signup.aspx">Signup</A><BR><A href="/Pages/forgotpassword.aspx">Lost Password</A></P>';
47: }
48: }
49: else
50: {
51: alert("Problem retrieving XML data");
52: }
53: }
54: }
55:
56: loadXMLDoc("/Pages/loggedinuser.aspx");
57: </script>
58: <span id="resultText"/>
59:
Admittedly this is not a solution that the little old lady with the white lunch box will be able to implement while she updates the bridge league site, but this might work just fine for a site about architecture which has a few smart people, a couple of MVP’s and me running around behind it.
You can download the page and the JavaScript in this file: DOWNLOAD
IMPORTANT NOTE: I have posted a follow up article which fixes some issues with this version. For more information see WSS and audience targeting - Part II.
MOSS 2007: Can't upload multiple files and can't use explorer view
:) Summarized version: This is on Windows 2008. (told you it was five words)
Anyway on this machine I wanted to upload a bunch of files a MOSS 2007 site, so I went to the action menu., file upload and… dum dum dum! The multiple file upload was gone! So I decided to switch to cool explorer view and drag the files in that way, nice quick and WRONG! It was broken too :(

Since I really didn't want to upload each file individually because it would take too long I needed to fix one of them, which began my usual problem solving process of try this, Google that, tweak this etc… but nothing worked :( After a while I started to think it was the server and not my machine, but no one else seemed to have an issue, so it must be my machine.
After more problem solving for my machine I stumbled over the problem came from the fact that because I was using Windows 2008 for Hyper-V… thus running 64bit. See in 64bit Windows there is two versions of Internet Explorer a 32bit and a 64bit version and I was running the 64bit version, changing to the 32bit version fixed the problem straight away.
Slide.Show and SharePoint: Part I - Configuring Slide.Show
This is a multi-part series. The other parts can be found at
- Slide.Show and SharePoint: Part II – Getting the data
- Slide.Show and SharePoint: Part III – Deploy and final config
This was inspired by a post on the IWSA group, about how to get a decent slide show in SharePoint using a picture library as a source. The poster went on to say he Slide.Show looked like it would meet his need and wondered if it could be used. For those who do not know Slide.Show is a cool Silverlight 1.0 component which takes a list of images and displays them as a slide show, with the presentation looking brilliant. Slide.Show has options like pausing, skipping the current image, viewing a grid of thumbnails so you select which one to skip to, and even a full screen view! It has in fact over 300 options you can tweak to get it just the way you like it!
/>If you don't know what SharePoint is, how is life under that rock? ;) SharePoint (or as it is officially known as Microsoft Office SharePoint Server) is a cool system too, it has all kinds of functions for document management. One of them is a picture library but the downside of the picture library when displayed normally is a boring list or if you configure it one static picture… *YAWN*. So there is a perfect harmony just waiting occur!
But how can you use Slide.Show together with SharePoint? I wish it was as straight forward to add a web part in, but it isn't. That said it is not difficult to get up and running and requires a few tricks and thinking outside the SharePoint box to get up and running.
The first step is to add a Content Editor Web Part (CEWP), which can be found under the Miscellaneous section. 
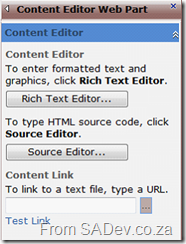
The CEWP is interesting in that it allows you to set the content using rich text (ala Microsoft Wordpad like options) or actually put the HTML directly into it using the Source Editor option. Being able to put HTML directly in does not mean just HTML, but means that you can actually put anything in it and have total power of what will be rendered! Since we will be using a lot of JavaScript this is exactly what we need to use, to get Slide.Show into SharePoint.
The first step in getting this working is to get Slide.Show setup, so once you have downloaded the source package and extracted it you need to run the release.bat file which will combine a lot of JS files into two files in a release folder. You then need to take the release folder and place it in a folder under your SharePoint web site, which is definitely the cleanest way to configure it, but I preferred to take the Slide.Show folder (part of the files extracted) and place it under the SharePoint web site as it allows me to run some tests to make it easier to get the system setup correctly as in the screen shot below.

If you have also followed my thinking about taking the slightly messier config, you should be able fire up your favorite browser and type in http://<your website>/slide.show/samples/empty/default.html which should show you a pure black screen (right click and it should say Silverlight config). The point of that boring sample is that it just makes sure that the content is available, there is no server issues or client issues preventing it for working. Another simple test to check everything is configured correctly is to go to http://<your website>/slide.show/scripts/release/silverlight.js which should prompt to download it (like in the picture below).

Now that Slide.Show is configured correctly we will get back to the CEWP we now need to plop the code into it to make it work. Since the CEWP allows us to actually drop in any source, we will use that to put in the JavaScript we need for Slide.Show to work. This is where we lose the straight-forwardness of doing this, because if you thought you could follow the Slide.Show quick start guide and get it to work… you would be screwed. This is because we can't put in the <script> tags in the header of the page like the quick start guide tells us as SharePoint won’t let that happen. So our first step is to put our own code in to load and run the JS files and then we can then start using Slide.Show as normal.
To do this we first need a to tell the system that we will be running some JavaScript by a normal script tag:
Note: A complete version of the JavaScript is available at the end of the article without number to allow for easy copy and paste.
1: <script language="JavaScript">
Next we will use the XMLHttpRequest class to load the JS file synchronously. However if we just called XMLHttpRequest then this would only work in real web browsers (IE 7 and higher, Firefox etc…) but since so many people use older IE versions we need to cater for them by adding a bit of code like this (source of the next 8 lines is not my bubble like mind but Wikipedia):
1: // Provide the XMLHttpRequest
    class for IE 5.x-6.x:
2: if( typeof XMLHttpRequest == "undefined" ) XMLHttpRequest = function() {
3: try { return new ActiveXObject("Msxml2.XMLHTTP.6.0") } catch(e) {}
4: try { return new ActiveXObject("Msxml2.XMLHTTP.3.0") } catch(e) {}
5: try { return new ActiveXObject("Msxml2.XMLHTTP") } catch(e) {}
6: try { return new ActiveXObject("Microsoft.XMLHTTP") } catch(e) {}
7:   throw new Error( "This browser
        does not support XMLHttpRequest." )
8: };
For the following example we will just load one file, but when we are done we will need to repeat this for all our JS files:
1: var silverlightRequest = new XMLHttpRequest();
2: silverlightRequest.open("GET", "/slide.show/Scripts/Release/Silverlight.js", false);
3: silverlightRequest.send(null);
NOTE: If you have put Slide.Show in a different location to me then you need to adjust the second line as needed.
The last line of loading the file is to call the eval function which will allows us to execute the JavaScript from the JS we retrieved. This enables the classes and methods will be available to us:
1: eval(silverlightRequest.responseText);
Once we have loaded both Slide.Show JS files, we can then use Slide.Show as normal by calling:
1: new SlideShow.Control();
1: </script>
Now click OK to close the HTML source code editor and OK (or apply) again for the web part and it should give us the same result as our first test, the empty sample. That’s kind of boring so to end off part one in this series lets modify the Slide.Show creation line to load a configuration file from one of the samples, and we will use the Flickr one as it requires nothing on the machine. The modified Slide.Show creation line with the configuration specified looks like:
1: new SlideShow.Control(new SlideShow.XmlConfigProvider({ url: "/slide.show/Samples/Flickr/configuration.xml" }));

The full JavaScript that we would place in the CEWP to get it this far would look like this:
<script language=
"JavaScript">
// Provide the XMLHttpRequest class for IE 5.x-6.x:
if( typeof XMLHttpRequest == "undefined" ) XMLHttpRequest = function() {
try { return new ActiveXObject("Msxml2.XMLHTTP.6.0") } catch(e) {}
try { return new ActiveXObject("Msxml2.XMLHTTP.3.0") } catch(e) {}
try { return new ActiveXObject("Msxml2.XMLHTTP") } catch(e) {}
try { return new ActiveXObject("Microsoft.XMLHTTP") } catch(e) {}
throw new Error( "This browser does not support XMLHttpRequest." )
};
var silverlightRequest = new XMLHttpRequest();
 silverlightRequest.open(
"GET", "/slide.show/Scripts/Release/Silverlight.js", false);
 silverlightRequest.send(
null);
eval(silverlightRequest.responseText);
var slideshowRequest = new XMLHttpRequest();
 slideshowRequest.open(
"GET", "/slide.show/Scripts/Release/SlideShow.js", false);
 slideshowRequest.send(
null);
eval(slideshowRequest.responseText);
new SlideShow.Control(new SlideShow.XmlConfigProvider({ url: "/slide.show/Samples/Flickr/Configuration.xml" }));
</script>
- Update – 25 Sept 2008: I have cleaned up this post a bit to make it easier to understand.
- Update – 26 Sept 2008: Added information/fix to get it to work on older IE versions.
Making ASP.NET pages look like MSCRM
Microsoft CRM supports many customizations, some of them are simple (adding a field) while others (also simple to do) actually allow you to embed other web pages view IFrames or add new buttons to the tool bar or the links on the left hand side of the window. This is great as part of the ability to link pages in is that CRM automatically passes various parameters to the web page that is being referenced, including the Guid and type of object. This means if you build a web page your web page gets context information for free (no weird JavaScript to navigate to it).
The problem seen at many customers is that these pages look nothing like CRM. This would make sense if you are embedding something like Live Maps, but if you are building the pages yourself why not make them look like CRM. This improves the user experience significantly and really isn't hard to do. In fact Microsoft has shipped a sample in the SDK for you. The problem is this is a HTML page and when converting to ASP.NET you will hit a few problems. However it is a simple 9 quick steps to get it right. So let's get into how to make your ASP.NET page look like Microsoft CRM.
- Once you have loaded your project (I am assuming you are using a new asp.net page which has had nothing done to it), navigate to where you have extracted the CRM SDK, and under it you will find a style sheet you will need. It can be found in: CRM SDK\sdk samples\stylesheet\template.css. Add this to your project.
- Next drag the CSS file from the solution explorer onto the default.aspx (I am assuming that Visual Studio is in design view and not source view). If you get this right the background will go that lovely light blue.
- Next open the sample html page (CRM SDK\sdk samples\stylesheet\sample.htm) in your favorite text editor and copy the content from opening body tag to closing body tag. Now switch VS to source mode and replace the asp.net pages content from opening body tag to closing body tag with the copied source.
- When you try to switch back to design view you will get 11 errors. Thankfully it is easy to fix those. li>
- The first fix is to add the runat attribute to the form tab and move it up two lines so it appears above the table tag. So it looks like the image here.
- Next move line 245 to after the closing table tab on the following line so it looks like the image here.
- Now remove line 15 (should just have </td> in it).
- You should be able to get back to design view! But you will be greeted by something not very CRM like still
- Lastly switch back to source and go to line 3 (should start with: <!DOCTYPE) and remove it. This line controls if Internet Explorer works in standards compliant mode or quirks mode, which is a non-standard rendering method. As CRM works solely on IE on Windows, there was no need for compliancy and thus the designers didn't include this and used non-compliant tricks to improve the UI, like tables expanding to but not exceeding 100% of screen height and the gradient effects. <
Tech•Ed 2006 Presentation and Samples
(This is a repost of the content which was previously available on the IW community site)
At Tech·Ed Africa 2006, myself and Bruce Nicholson did a presentation on integration with Microsoft Dynamics CRM 3.0. While the slides were available for print, and on the event DVD, the code samples were not. No idea why since they were all submitted at the same time but that's life. So now for the first time here are the slides and all the code samples available for download!!
Duplicate Assigns On Create
Here is an interesting effect which I was solved recently, namely when an item in MSCRM was created the assign event (both callout and workflow) would fire twice. This was very odd and great lengths were taken to track it down, using the MSCRM trace tool, various tests etc… But since this was one instance of the problem which could not be replicated at other sites it was eventually shelved until more important issues were resolved.
This issue only occurred during creations from outside sources (namely my code) and didn't happen if you created the item in the MSCRM interface. But this was normal code where I created the item, set the properties and passed it to the Create method. Nothing fancy here. The issue was that I couldn't see the trees because of the forest, namely I was setting the ownerid parameter as one of the parameters.
What this was doing internally was causing the assign to fire when the item was created and then to cause a second assign to fire to handle the ownerid. Removing that one line of code fixed the issue up immediately.

