Note worthy
I have been very focused during the day on a project and my evenings have been taken up a lot with VSTS Rangers work so the blog has lagged a bit so here are some things you should be aware of (if you follow me on Twitter, then you probably have heard these in 140 characters or less):
I was awarded the title of VSTS Rangers Champion - this is a great honour since it is a peer vote from VSTS External Rangers (no Microsoft Staff) and MVP’s for involvement in the VSTS Rangers projects.
The VSTS Rangers shipped the alpha of the integration platform for TFS 2010 - this is important for me because it means some of the bits I have worked on are now public and I am expecting some feedback to get them better for beta and release next year. It is also important since my big contribution to the integration platform, which is an adapter I will cover in future blog posts, has a fairly stable base.
Dev4Dev’s in coming up in just over a week. This is one of my favourite events because it really is event for passionate developers since they have to give up a Saturday morning for it (no using an event to sneak off work). I will be presenting on Visual Studio 2010! Which should be great, based on my first dry run to an internal audience at BB&D last week. Two more of my BB&D team mates will be presenting Zayd Kara on TFS Basic and (if memory serves me) Rudi Grobler on Sketchflow!
The Information Worker user group is really blowing my mind with it’s growth, on Tuesday we had 74 people attend our meeting. For a community that only had a 100 or so people signed up on the website at the beginning of the year that is brilliant. Thanks must go to my fellow leads: Veronique, Michael, Marc, Zlatan, Hilton and Daniel. We will be having a final Jo’burg event for the year on the 2nd and it will be a fun ask the experts session.
NDepend - The field report
I received a free copy of NDepend a few months back, which was timed almost perfectly to the start of a project I was going on to. However before I get to that, what is NDepend?
NDepend is a static analysis tool, in other words it looks at your compiled .NET code and runs analysis on it. If you know the Visual Studio code analysis or FxCop then you are thinking of the right thing - except this is not design or security rules but more focused at the architecture of the code.
Right back to the field, the new project has gone through a few phases:
- Fire fighting - There were immediate burning issues that needed to be resolved.
- Analysis - Now that the fires are out, what caused them and how do we prevent it going forward.
- Hand over - Getting the team who will live with the project up to speed.
Right, so how did NDepend help me? Well let’s look at each phase since it has helped differently in each phase.
Note: The screen shots here are not from the project, since that is NDA - these are from the application I am using in my upcoming Dev4Dev’s talk.
Fire Fighting
The code base has over 30000 lines of code and the key bugs were very subtle and almost impossible to duplicate. How am I supposed to understand it quick enough? Well first I ran the entire solution and I start looking at it in the Visual Explorer:
The first thing that it helps is dependency graph in the middle which visually shows me what depends on what, not just one level but multiple levels and so on a large project it could look like:
Now that may be scary to see, but you can interact with it and zoom, click and manipulate it to find out what is going on.
For fighting code I could sit with the customer people, and easily see where the possible impact could be coming from. So that gets it down to libraries, but what about getting it down further? Well I can use the metrics view (those black squares at the top of the image above) which I change what they mean - so maybe the bigger the square the bigger the method, class, library etc… so using the logic that at some magical point (about 200 lines - according to Code Complete by Steve McConnell), the bigger the method the more likely that there is bugs in it. I could use that to find out where to spend time looking for the problems first, which meant that the problems were found quicker and resolved.
Analysis
Right now that the fires were over moved on to analysis to make sure that it never happened again - well when a project is analysed by NDepend it produces an HTML report with the information above but also a lot of other information like this cool chart which shows how much your assemblies are used (horizontal axis) vs. how a change may effect other parts of the code (vertical axis):
And that is great to see what you should focus on in refactoring (or maybe what to avoid), but there is another part which is more powerful and that is the CQL language which is like SQL but for code so you can have queries like show me the top 10 methods which have more than 200 lines of code:
WARN IF Count > 0 IN SELECT TOP 10 METHODS WHERE NbLinesOfCode > 200 ORDER BY NbLinesOfCode DESC
Some of these are in the report, but there is loads more in the visual tool and you can even write your own. I found that I ended up writing a few to understand where some deep inheritance was getting used when it came to exception handling specifically. In the visual tool this is all interactive too, so when you run that query it lights up the dependency tree and the black squares so you can easily see what is the problem spots and identify hot spots in the code.
Hand Over
Moving the final stages, I have to get the long term guys up to speed - how do I do that in a way they can understand without going through the code line by line? Easy, just pop this on a projector and use it as your presentation tool, with a custom set of CQL’s as slides or key points to show. What makes this shine is that it is live and interactive so when taking questions or doing a discussion you can easily move to other parts and highlight those.
All Perfect Then?
No, there are some minor UI issues that are more annoyance than anything else (labels not showing correctly in the ribbon mode or the fact that you must specify a project extension), but those are easily overlooked. The big problem is that this is not something you can pick up and run with - in fact I had tried NDepend a few years back and decided it wasn’t for me very quickly. If it wasn’t for a lot more experience and having an immediate need which forced me over that steep initial learning curve then I would never have gotten how powerful it is. That also brings up another point, the curve is steep - and if you aren’t used to metrics and thinking on an architectural level then this tool will really cause your head to melt and so this is not a tool for every team member, it is a tool for the architects and senior devs in your team to use.
Using Outlook 2010 with Google Calendar
Update 1 October 2010: If you want FULL sync, then Google has updated there sync tool to support Outlook 2010 - please go to the Gmail blog for more info. Comments to this post will also be disabled as there is nothing left to say.
If you are using Google Calendar and want to use it with Outlook 2010, you will find that the Google Calendar Sync tool no longer works ![]()
So what can you do? Well Outlook 2010 supports the iCal format and so does Google Calendar - so you can use that to get a basic sync between the two.
To set this up go to your calendar details page in Google Calendar (Settings link at the top of the window then Calendars and finally click on the calendar name), and at the very bottom of the is two sets of icons one public & one private. Right click the iCal icon from the private and select copy URL.
Now in Outlook, go to your calendar and click the Open Calendar button and select From Internet, now paste the URL in the text box and click OK.
There you go, your Google Calendar is now in Outlook 2010.
Downside to this is you now have two calendars in Outlook to work with, but if you click that little arrow next to the calendar name ![]() you can have them display as one and you can easy copy/paste between them.
you can have them display as one and you can easy copy/paste between them.
VS2010/TFS2010 Information Landslide Begins
 Yesterday (19th Oct) the information landslide for VS2010 & TFS2010 began with a number of items appearing all over:
- First (and most important) is that BETA 2 of VS2010 is available for download to MSDN subscribers AND everyone else. For more information on that see http://microsoft.com/visualstudio/2010UltimateOffer
- Since not everyone will upgrade their development tools to VS2010 straight away, you may find yourself needing to connect VS2008 to a TFS2010 server. To enable that you need to install the forward compatibility update which you can get from: http://www.microsoft.com/downloads/details.aspx?displaylang=en&FamilyID=cf13ea45-d17b-4edc-8e6c-6c5b208ec54d
- The product SKU for Visual Studio 2010 is changing in a lot of ways to make it much simpler so make sure you are up to speed on it via the whitepaper and the Ultimate Offer site (see first link).
- New product logos for Visual Studio, you can see it above (no more orange?)
- MSDN has had a major over hall and now has information targeted for developers based on location. Oh and there is a new logo for MSDN too:

- John Robbins has a great series on the new debugger features available in VS2010 beta 2:
TechEd was Green
 Two months after the event I finally get around to posting a commentary on an aspect of Tech-Ed Africa, that was so under stated that I am wondering if I attended the same event as every one else. This year Tech-Ed Africa really decided, maybe intentionally and maybe not, to be a very green event. By green I mean the whole environmental aspect. How did they do this:
- Delegates bags - one of the highlight of Tech-Ed has always been the delegate bag, which generally I use for the whole next year. They are always great quality but this years bags are made by Owl, and almost every thing that made up the bag was from recycled materials.
- Paper less - Missing from the bag was the usual pad of writing paper. Yes, less paper saves trees.
- Presentation CD’s - At the end of the event you used to get a CD/DVD with all the slides on it. Not this year, all had to be downloaded later. This is great for the environment as you have less disks to make which generally don’t get used much. As a speaker this is also great since it means the deadline for getting the completed slides to the staff was much longer, so those last minute tweaks that the audience sees, now make the download.
Very interesting approach - would love to know if more was done and why it was not punted more.
Two new Visual Studio snippets
 I’ve been working on an interesting project recently and found that I needed two pieces of code a lot, so what better than wrapping them as snippets.
What are snippets?
Well if you start typing in VS you may see some options with a torn paper icon, if you select that and hit tab (or hit tab twice, once to select and once to invoke) it will write code for you! These are contained in .snippet files, which are just XML files in a specific location.
To deploy these snippets copy them to your C# custom snippet’s folder which should be something like C:\Users\<Username>\Documents\Visual Studio 2008\Code Snippets\Visual C#\My Code Snippets
You can look at the end of this post for a sample of what the snippets create, but lets have a quick overview of them.
Snippet 1: StructC
Visual Studio already includes a snippet for creating a struct (which is also the snippet) however it is very bland:
StructC is a more complete implementation of a struct, mainly so it complies with fxCop requirements for a struct. So it includes:
- GetHashCode method
- Both Equals methods
- The positive and negative equality operators (== and !=)
- Lots of comments
which all in all runs in at 74 lines of code, rather than the three you got previously.
Warning - the GetHashCode uses reflection to figure out a unique hash code, but this may not be best for all scenarios. Please review prior to use.
Snippet 2: Dispose
If you are implementing a class that needs to inherit IDisposable you can use the the option in VS to implement the methods.
Once again from a fxCop point of view it is lacking since you just get the Dispose method. Now instead of doing that you can use the dispose snippet which produces 41 lines of code which has:
- Region for the code - same as if you used the VS option
- Properly implemented Dispose method which calls Dispose(bool) and GC.SuppressFinalize
- A Dispose(bool) method for cleanup of managed and unmanaged objects
- A private bool variable to make sure we do not call dispose multiple times.
StructC Sample
/// <summary></summary>
struct MyStruct
{
    //TODO: Add properties, fields, constructors etc...

    /// <summary>
    /// Returns a hash code for this instance.
    /// </summary>
    /// <returns>
    /// A hash code for this instance, suitable for use in hashing algorithms and data structures like a hash table.
    /// </returns>
    public override int GetHashCode()
    {
        int valueStorage = 0;
        object objectValue = null;
        foreach (PropertyInfo property in typeof(MyStruct).GetProperties())
        {
            objectValue = property.GetValue(this, null);
            if (objectValue != null)
            {
                valueStorage += objectValue.GetHashCode();
            }
        }

        return valueStorage;
    }

    /// <summary>
    /// Determines whether the specified <see cref="System.Object"/> is equal to this instance.
    /// </summary>
    /// <param name="obj">The <see cref="System.Object"/> to compare with this instance.</param>
    /// <returns>
    ///     <c>true</c> if the specified <see cref="System.Object"/> is equal to this instance; otherwise, <c>false</c>.
    /// </returns>
    public override bool Equals(object obj)
    {
        if (!(obj is MyStruct))
            return false;

        return Equals((MyStruct)obj);
    }

    /// <summary>
    /// Equalses the specified other.
    /// </summary>
    /// <param name="other">The other.</param>
    /// <returns></returns>
    public bool Equals(MyStruct other)
    {
        //TODO: Implement check to compare two instances of MyStruct

        return true;
    }

    /// <summary>
    /// Implements the operator ==.
    /// </summary>
    /// <param name="first">The first.</param>
    /// <param name="second">The second.</param>
    /// <returns>The result of the operator.</returns>
    public static bool operator ==(MyStruct first, MyStruct second)
    {
        return first.Equals(second);
    }

    /// <summary>
    /// Implements the operator !=.
    /// </summary>
    /// <param name="first">The first.</param>
    /// <param name="second">The second.</param>
    /// <returns>The result of the operator.</returns>
    public static bool operator !=(MyStruct first, MyStruct second)
    {
        return !first.Equals(second);
    }
}
Dispose Sample
#region IDisposable Members

/// <summary>
/// Internal variable which checks if Dispose has already been called
/// </summary>
private Boolean disposed;

/// <summary>
/// Releases unmanaged and - optionally - managed resources
/// </summary>
/// <param name="disposing"><c>true</c> to release both managed and unmanaged resources; <c>false</c> to release only unmanaged resources.</param>
private void Dispose(Boolean disposing)
{
    if (disposed)
    {
        return;
    }

    if (disposing)
    {
        //TODO: Managed cleanup code here, while managed refs still valid
    }
    //TODO: Unmanaged cleanup code here

    disposed = true;
}

/// <summary>
/// Performs application-defined tasks associated with freeing, releasing, or resetting unmanaged resources.
/// </summary>
public void Dispose()
{
    // Call the private Dispose(bool) helper and indicate
    // that we are explicitly disposing
    this.Dispose(true);

    // Tell the garbage collector that the object doesn't require any
    // cleanup when collected since Dispose was called explicitly.
    GC.SuppressFinalize(this);
}

#endregion
S.A. Architect Stats
One of the best advantages of switching WCMS (Web Content Management System) is that I could finally switch to using Google Analytics for the statistics of the site which gives a insane amount of information for the site now. Below are some reports of the status on the site. Interesting notes:
- Big spike on the 22nd - which I think is from the MSDN Flash which included information about the site.
- Traffic is mostly direct or from search engines.
- 60% of users to the site use Internet Explorer, which is odd since you would think in IT dominated site it would be lower.
- 2% of users use a dialup :(
ASP.NET MVC Cheat Sheets
My latest batch of cheat sheets is out on DRP which are focused on ASP.NET MVC. So what is in this set:
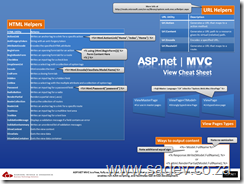
ASP.NET MVC View Cheat Sheet
This focuses on the HTML Helpers, URL Helpers and so on that you would use within your views.
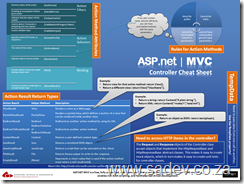
ASP.NET MVC Controller Cheat Sheet
This focuses on what you return from your controller and how to use them and it also includes a lot of information on the MVC specific attributes.
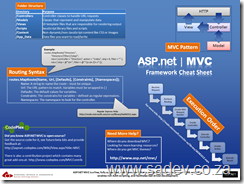
ASP.NET MVC Framework Cheat Sheet
This focuses on the rest of MVC like routing, folder structure, execution pipeline etc… and some info on where you can get more info (is that meta info?).
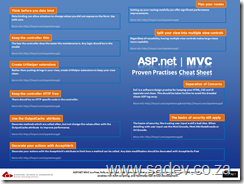
ASP.NET MVC Proven Practises Cheat Sheet
This contains ten key learnings that every ASP.NET MVC developer should know - it also includes links to the experts in this field where you can get a ton more information on those key learning's.
What are the links in the poster?
Think before you data bind
TinyURL: http://TinyURL.com/aspnetmvcpp1
Full URL: http://www.codethinked.com/post/2009/01/08/ASPNET-MVC-Think-Before-You-Bind.aspx
Keep the controller thin
TinyURL: http://tinyurl.com/aspnetmvcpp2
Full URL: http://codebetter.com/blogs/ian_cooper/archive/2008/12/03/the-fat-controller.aspx
Create UrlHelper extensions
TinyURL: http://tinyurl.com/aspnetmvcpp3
Full URL: http://weblogs.asp.net/rashid/archive/2009/04/01/asp-net-mvc-best-practices-part-1.aspx#urlHelperRoute
Keep the controller HTTP free
TinyURL: http://tinyurl.com/aspnetmvcpp4
Full URL: http://weblogs.asp.net/rashid/archive/2009/04/01/asp-net-mvc-best-practices-part-1.aspx#httpContext
Use the OutputCache attribute
TinyURL: http://tinyurl.com/aspnetmvcpp5
Full URL: http://weblogs.asp.net/rashid/archive/2009/04/01/asp-net-mvc-best-practices-part-1.aspx#outputCache
Plan your routes
TinyURL: http://tinyurl.com/aspnetmvcpp6
Full URL: http://weblogs.asp.net/rashid/archive/2009/04/03/asp-net-mvc-best-practices-part-2.aspx#routing
Split your view into multiple view controls
TinyURL: http://tinyurl.com/aspnetmvcpp7
Full URL: http://weblogs.asp.net/rashid/archive/2009/04/03/asp-net-mvc-best-practices-part-2.aspx#userControl
Separation of Concerns (1)
TinyURL: http://tinyurl.com/aspnetmvcpp8
Full URL: http://blog.wekeroad.com/blog/asp-net-mvc-avoiding-tag-soup
Separation of Concerns (2)
TinyURL: http://tinyurl.com/aspnetmvcpp9
Full URL: http://en.wikipedia.org/wiki/Separation_of_concerns
The basics of security still apply
TinyURL: http://tinyurl.com/aspnetmvcpp10
Full URL: http://www.hanselman.com/blog/BackToBasicsTrustNothingAsUserInputComesFromAllOver.aspx
Decorate your actions with AcceptVerb
TinyURL: http://tinyurl.com/aspnetmvcpp11
Full URL: http://weblogs.asp.net/rashid/archive/2009/04/01/asp-net-mvc-best-pract…
VSTS Rangers - Using PowerShell for Automation - Part II: Using the right tool for the job
PowerShell is magically powerful - besides the beautiful syntax and the commandlets there is the ability to invoke .NET code which can lead you down a horrible path of trying to do the super solution by using these, writing a few (hundred) lines of code and ignoring some old school (read: DOS) ways of solving a problem. This is similar to the case of when you only have a hammer everything is a nail - except this is the alpha developer (as in alpha male) version where you have 50 tools but 1 is newer and shiner so that is the tool you just have to use.
So with the VSTS Rangers virtualisation project we are creating a VM which is not meant for production (in fact I think I need to create a special bright pink or green wallpaper for it which has that written over it), and so we want to make it super easy for connections and the users of this VM. So one example of where the PowerShell version of the command and the DOS version is so much easier is allowing all connections in via the firewall.
So in there is a command line tool call netshell (netsh is the command) and if you just type it you get a special command prompt and can basically change every network related setting. However the genius who designed this (and it is so well designed) is that you can type a single command at a time or chain commands up in the netsh interface (which makes it easy to test) and then when you have a working solution you can provide it as a parameter to the netshell command. So to allow all connections in the command looks like:
netsh advfirewall firewall add rule name="Allow All In" dir=in action=allow
Once I had that - I slapped that into a PowerShell script, because PowerShell can run DOS commands and viola another script to the collection done, in 1 line :)
Another example of this is that I need the machine hostname for a number of things that I use in PowerShell and in DOS there is a create command called hostname. Well you can easily combine that with PowerShell by assigning it to a variable:
$hostname = hostname
Now I can just use $hostname anywhere in PowerShell and all works well.
Two days in and what's been happening?
Two days into the new S.A. Architect site and what's been happening?
- Added Willie Roberts to the community leads page - please blame me for forgetting to have him there in the first place.
- Got our first hosted blogger - Bramzer! Very keen to see what content he provides.
- Profile images are disabled - we having a technical issue with them which I hope to fix in the next week.
- Seeing more traffic than usual for a weekend on the site, which is in part due to the mails and so on, but more than that people are making use of things like the contact forms and so on! This is really great to see.
If you have suggestions or ideas on how to improve the site going forward, I'm looking at those two people who voted the site is average :) please let me know!


