.NET 4 Baby Steps: Part IV - Observer
 Note: This post is part of a series and you can find the rest of the parts in the series index.
The pub/sub pattern is a simple concept, you have a provider which has data which it pushes to subscribers and .NET 4 brings in two new interfaces IObservable<T> and IObserver<T> which make implementing this pattern very easy.
To see the usage of these interfaces, I would like to use the example of a device which has a GPS sensor which every second checks it’s position and if the position of the GPS leaves a specified area we then want to notify the cops.
GPSPosition
First we need a small class which tells us where we are, i.e. it is just a data class. Some key points of this class are
- I have implemented IComparable so I can check when the boundary is exceeded.
- I’ve overridden ToString so it prints nicely.
- I have two constructors, a default and one which takes a latitude and longitude so that I can copy the values from one object to another.
- Note that my parameter is named @long – because long is a reserved keyword in C# you can append @ to use it.
class GPSPosition : IComparable<GPSPosition>
{
    public int Lat { get; set; }
    public int Long { get; set; }

    public GPSPosition() { }

    public GPSPosition(int lat, int @long)
    {
        this.Lat = lat;
        this.Long = @long;
    }

    public override string ToString()
    {
        return string.Format("Latitude = {0:N4}, Longitude = {1:N4}", Lat, Long);
    }

    public int CompareTo(GPSPosition other)
    {
        if (this.Lat > other.Lat)
        {
            return 1;
        }

        if (this.Lat < other.Lat)
        {
            return -1;
        }

        // latitude is the same

        if (this.Long > other.Long)
        {
            return 1;
        }

        if (this.Long < other.Long)
        {
            return -1;
        }

        // long is the same
        return 0;
    }
}
GPSSensor
Now we need to create our fake sensor, which when asked tells us where in the world we are. Key points here are:
- It implements IObservable<T> so it is a provider of GPSPosition data. That means we needed to implement the subscribe method so other objects can tell this class to send them the data.
- We keep a list of the observers in a List<T>
- We call the observer.OnNext to send data to it.
- We call observer.OnCompleted when we are done with monitoring, which in our example is when we exceed the boundary.
- Note that in the GetPosition method we are responsible for sending data to all the observers.
class GPSSensor : IObservable<GPSPosition>
{
    List<IObserver<GPSPosition>> observers = new List<IObserver<GPSPosition>>();
    Random random = new Random();
    public GPSPosition Position { get; set; }

    private GPSPosition boundry;

    public GPSSensor()
    {
        this.Position = new GPSPosition();
        this.Position.Lat = random.Next(0, 181);
        this.Position.Lat = random.Next(0, 181);

        boundry = new GPSPosition(this.Position.Lat + 10, this.Position.Long + 10);
    }

    public void GetPosition()
    {
        GPSPosition current = new GPSPosition(this.Position.Lat, this.Position.Long);

        Position.Lat += random.Next(0, 5);
        Position.Long += random.Next(0, 5);

        if (current.CompareTo(this.Position) != 0)
        {
            foreach (IObserver<GPSPosition> observer in observers)
            {
                observer.OnNext(this.Position);
                if (current.CompareTo(boundry) > 0)
                {
                    observer.OnCompleted();
                }
            }
        }
    }


    public IDisposable Subscribe(IObserver<GPSPosition> observer)
    {
        observers.Add(observer);
        observer.OnNext(this.Position);
        return observer as IDisposable;
    }
}
Map
Our third class, Map is a subscriber of data and it handles the outputting to the screen and notification of the cops when we move past the boundary. Key notes here:
- It implements IObserver<GPSPosition> so it is a subscriber of GPS position data.
- We implement the three methods from the interface:
- OnCompleted for when we are done.
- OnError in case something goes wrong.
- OnNext for when new data is available.
class Map : IObserver<GPSPosition>
{
    private GPSPosition lastKnown;

    public bool StillTracking { get; private set; }

    public void OnCompleted()
    {
        Console.WriteLine("The device has moved beyond the boundsof our checking, notify the cops it was last seen at: {0}", lastKnown);
        StillTracking = false;
    }

    public void OnError(Exception error)
    {
        Console.WriteLine("SkyNet has taken over and shut down the GPS");
    }

    public void OnNext(GPSPosition value)
    {
        lastKnown = value;
        Console.WriteLine("At {0} we have moved to {1}", DateTime.Now, value);
        StillTracking = true;
    }
}
Main
We have created our data structure, our provider and and our subscriber - now we just need to bring them together in our main method, which is very easy:
public static void Main()
{
    GPSSensor sensor = new GPSSensor();
    Map map = new Map();
    sensor.Subscribe(map);
    do
    {
        sensor.GetPosition();
        Thread.Sleep(1000);
    } while (map.StillTracking);
}
This produces something that looks like:
.NET 4 Baby Steps: Part III - Enum
 Note: This post is part of a series and you can find the rest of the parts in the series index.
Enumerations are something I have posted about before because they are very useful and with .NET 4 they have had two new methods added which could have been ripped from my personal feature requests:
HasFlag
Enums can be bitwise values if the Flag attribute is set, however checking the bitwise values was ugly and very confusing for people who hadn’t seen it before. For example:
[Flags]
enum CupboardContents
{
    Nothing = 0,
    Cups = 1,
    Plates = 2,
    Cuttlery = 4,
    Food = 8,
    DeadBodies = 16,
    Everything = Nothing | Cups | Plates | Cuttlery | Food | DeadBodies
}

static void Main(string[] args)
{
    CupboardContents motherHubberbs = CupboardContents.Nothing;
    CupboardContents normal = CupboardContents.Plates | CupboardContents.Cups | CupboardContents.Cuttlery;
    CupboardContents hitman = CupboardContents.DeadBodies;
    CupboardContents bursting = CupboardContents.Everything;

    CupboardContents test = CupboardContents.Plates;

    Console.WriteLine("Does {0} contain {1} = {2}", motherHubberbs, test, (motherHubberbs & test) == test);
    Console.WriteLine("Does {0} contain {1} = {2}", normal, test, (normal & test) == test);
    Console.WriteLine("Does {0} contain {1} = {2}", hitman, test, (hitman & test) == test);
    Console.WriteLine("Does {0} contain {1} = {2}", bursting, test, (bursting & test) == test);
}
With .NET 4 we now we get a simple method to do this check, HasFlag, which takes an enum and tells you if that is set. The following code does the same as the code above:
Console.WriteLine("Does {0} contain {1} = {2}", motherHubberbs, test, motherHubberbs.HasFlag(test));
Console.WriteLine("Does {0} contain {1} = {2}", normal, test, normal.HasFlag(test));
Console.WriteLine("Does {0} contain {1} = {2}", hitman, test, hitman.HasFlag(test));
Console.WriteLine("Does {0} contain {1} = {2}", bursting, test, bursting.HasFlag(test));
TryParse
Until now the only way to get from a string to an enum has been the Parse method:
enum Colours
{
    Red,
    Green,
    Blue
}

static void Main(string[] args)
{
    Colours red = (Colours)Enum.Parse(typeof(Colours), "Red");

    Console.WriteLine(red);
}
Which produces 
However get the string wrong and you were forced to deal with an ArgumentException:
With .NET 4, you now can use TryParse method and check the returned value first to see if the conversion was successful:
enum Colours
{
    Red,
    Green,
    Blue
}

static void Main(string[] args)
{
    Colours red;
    Colours purple;
    if (Enum.TryParse("Red", out red))
    {
        Console.WriteLine(red);
    }
    else
    {
        Console.WriteLine("Could not translate to a valid enum");
    }

    if (Enum.TryParse("Purple", out purple))
    {
        Console.WriteLine(purple);
    }
    else
    {
        Console.WriteLine("Could not translate to a valid enum");
    }
}
Another benefit of this method over Parse is that it works with generics and that means you do not need to pass the Type parameter in and cast the return value as you had to do with Parse!
.NET 4 Baby Steps: Part II - String
 Note: This post is part of a series and you can find the rest of the parts in the series index.
I would guess strings are the most used type in .NET, so it is great to see some small improvements with them in .NET 4.
IsNullOrWhiteSpace
Since .NET 2.0 we have had the very useful IsNullOrEmpty which let us check for empty strings, but what about strings that contained nothing but white space? Unfortunately that would not be identified as empty! With .NET 4 we have a new method, IsNullOrWhiteSpace, which checks if a string is null, empty and if it is not just white space! Example usage:
string nullString = null;
string emptyString = string.Empty;
string blankString = emptyString.PadRight(30, ' ');
string notBlankString = "SADev.co.za";

Console.WriteLine("IsNullOrEmpty");
Console.WriteLine("\t nullString is: {0}", string.IsNullOrEmpty(nullString));
Console.WriteLine("\t emptyString is: {0}", string.IsNullOrEmpty(emptyString));
Console.WriteLine("\t blankString is: {0}", string.IsNullOrEmpty(blankString));
Console.WriteLine("\t notBlankString is: {0}", string.IsNullOrEmpty(notBlankString));

Console.WriteLine("IsNullOrWhiteSpace");
Console.WriteLine("\t nullString is: {0}", string.IsNullOrWhiteSpace(nullString));
Console.WriteLine("\t emptyString is: {0}", string.IsNullOrWhiteSpace(emptyString));
Console.WriteLine("\t blankString is: {0}", string.IsNullOrWhiteSpace(blankString));
Console.WriteLine("\t notBlankString is: {0}", string.IsNullOrWhiteSpace(notBlankString));
This produces
The important one to note is blankString, in the second set (line 15 of the code) has a different result compared to it’s result in the first set.
Join & Concat
Join allows us to concatenate an array of strings together with a specific separator character in place. For example:
string[] someValues = { "This", "is", "a", "list", "of", "strings" };
Console.WriteLine(string.Join(Environment.NewLine,someValues));
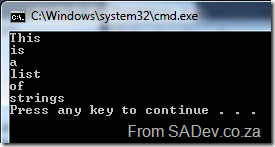
This produces
Concat does the same thing, except there is no separate character. Example:
string[] someValues = { "This", "is", "a", "list", "of", "strings" };
Console.WriteLine(string.Concat(someValues));
This produces:
Both these methods fails when we start working with generic lists, like List<T> as they were not supported. This meant you often ended up calling .ToArray on the list and taking the performance impact. Now new overloads have been added to string which cater for IEnumerable<T> so we no longer need to ToArray the list. Now we can pass the list directly in, as in the following example:
List<string> someValues = new List<string>() { "This", "is", "a", "list", "of", "strings" };
Console.WriteLine(string.Join(Environment.NewLine, someValues));
.NET 4 Baby Steps - Part I: TimeSpan
 Welcome to part one of a new series of blog posts which will cover what is new in .NET 4. To be different I am not looking at the big features, like WF 4 or the super cool parallel stuff. This series will cover the smaller features, like new methods on existing classes or whole new classes which have been added. As with all series I do, you can see the rest of the post in the series on the series index.
We’ll start off with TimeSpan, which has been around since .NET 1.0 and represents a time interval (duration of time or elapsed time) that is measured as a positive or negative number of days, hours, minutes, seconds, and fractions of a second. So what is new in TimeSpan for .NET 4?
Parse & TryParse
Parse & TryParse are methods which have been around since the beginning and let you input a string in a specific format [-][d’.’]hh’:’mm’:’ss[‘.’fffffff]. and get a TimeSpan object back. For example:
TimeSpan oneFranctionSecond = TimeSpan.Parse("0.00:00:00.1");
TimeSpan oneHour = TimeSpan.Parse("1:00");
TimeSpan oneThousandDaysPast = TimeSpan.Parse("-1000.00:00");
Console.WriteLine(oneFranctionSecond);
Console.WriteLine(oneHour);
Console.WriteLine(oneThousandDaysPast);
What is new in parsing? The ability to add in culture information through IFormatProvider. Why is this important? Because not everyone formats numbers the same. For example:
CultureInfo us = CultureInfo.GetCultureInfo("en-us"); // America
CultureInfo rm = CultureInfo.GetCultureInfo("rm"); // No idea, but it has my initials ;)
CultureInfo za = CultureInfo.GetCultureInfo("en-za"); // South Africa

string usResult = string.Format(us, "{0:N}", 100000);
string rmResult = string.Format(rm, "{0:N}", 100000);
string zaResult = string.Format(za, "{0:N}", 100000);

Console.WriteLine("America:\t {0}", usResult);
Console.WriteLine("RM:\t\t {0}", rmResult);
Console.WriteLine("South Africa:\t {0}", zaResult);
Produces: 
See how all three locations have different formats, and this is important because the old methods couldn’t cope with these differences in numbers - they could only accept a single specific format.
Now we can do the following:
CultureInfo us = CultureInfo.GetCultureInfo("en-us"); // America
CultureInfo ru = CultureInfo.GetCultureInfo("ru-RU"); // Russia

TimeSpan oneFranctionSecondUS = TimeSpan.Parse("6:12:14:45.3448", us);
TimeSpan oneFranctionSecondRU = TimeSpan.Parse("6:12:14:45,3448", ru);

Console.WriteLine(oneFranctionSecondUS);
Console.WriteLine(oneFranctionSecondRU);
Note the comma in the Russian formatting, if you tried this in .NET 3.5 or before you would’ve gotten a FormatException but now it works!
ParseExact & TryParseExact
These are two brand new methods which let us specify the format string to use. Until now we have had to make sure we complied with: [-][d’.’]hh’:’mm’:’ss[‘.’fffffff].
Now we do not need to comply with a single format. We have two options with the format string either a build in one or a custom one. The built in ones are:
- c/t/T : These three do the same and this is what we are used to currently, namely: [-][d’.’]hh’:’mm’:’ss[‘.’fffffff].
- Examples:
- TimeSpan.Zero -> 00:00:00
- New TimeSpan(0, 0, 30, 0) -> 00:30:00
- New TimeSpan(3, 17, 25, 30, 500) -> 3.17:25:30.5000000
- Examples:
- g: The cultural sensitive short format. This is basically the same as c but the format provider supplied will be respected where c ignores it: [-][d’:’]h’:’mm’:’ss[.FFFFFFF].
- Examples:
- New TimeSpan(1, 3, 16, 50, 500) -> 1:3:16:50.5 (en-US)
- New TimeSpan(1, 3, 16, 50, 500) -> 1:3:16:50,5 (fr-FR)
- New TimeSpan(1, 3, 16, 50, 599) -> 1:3:16:50.599 (en-US)
- New TimeSpan(1, 3, 16, 50, 599) -> 1:3:16:50,599 (fr-FR)
- Examples:
- G: The cultural sensitive long format in which there is no optional items, except the negative symbol: [-]d’:’hh’:’mm’:’ss.fffffff.
- Examples:
- New TimeSpan(18, 30, 0) -> 0:18:30:00.0000000 (en-US)
- New TimeSpan(18, 30, 0) -> 0:18:30:00,0000000 (fr-FR)
We also have custom ones now, so we can really tweak it and this will be great for interoperability. I am not going to list all the parts as there is a lot, but every individual component is covered. Some examples of what we can now do are:
TimeSpan oneFranctionSecond = TimeSpan.ParseExact("1", "%F", CultureInfo.CurrentCulture);
TimeSpan oneMinuteThirtySeconds = TimeSpan.ParseExact("1:30", @"%m\:%s", CultureInfo.CurrentCulture);
TimeSpan oneDay = TimeSpan.ParseExact("1", "%d", CultureInfo.CurrentCulture);
TimeSpan oneDayAndTwoHours = TimeSpan.ParseExact("1=2", @"%d\=%h", CultureInfo.CurrentCulture);

Console.WriteLine(oneFranctionSecond);
Console.WriteLine(oneMinuteThirtySeconds);
Console.WriteLine(oneDay);
Console.WriteLine(oneDayAndTwoHours);
Which produces: 
.NET 4 Baby Steps: Series Index
This page lists all the posts in the series.
- Part I: TimeSpan
- Part II: String
- Part III: Enum
- Part IV: Observer
- Part V: Lazy
- Part VI: SortedSet
- Part VII: Caching
- Part VIII: Enumerate Directories and Files
- Part IX: Stream
- Part X: Location, Location, Location
- Part XI: Special Folders
- Part XII: Numbers
- Part XIII: Tiny Steps - the place for things too small to get their own post
Writing JavaScript Easier with jQuery and Visual Studio 2010!
My first time presenting at DevDays was a great experience with me presenting in the community slot. I told the attendees of my session that they were the smart ones because being at the end of the day, only the dedicated people were left and those dedicated people got two presentations for the price of one timeslot.
The session itself covered how writing JavaScript easier with jQuery and Visual Studio 2010 which you can see below. Now the slides below are not being done using some special PowerPoint to web tool, but are HTML which uses jQuery. Using the same technology as I was presenting on and building it in Visual Studio 2010 really highlighted how powerful and easy this was to do. To navigate the slides click the grey dots at the top or click on the slide and press = to go forward and – to go back.
They are a little wide for the website, so to see them in a new window click here
The demo used jQuery and Visual Studio 2010 to clean up the page, and then connect to StackOverflow to pull down my stats and display them to the audience. The completed demo code (which is not included above, so the demo page won’t work) is as follows (this goes in the HEAD tags in demo .html page):
<script src="jQuery/jquery-1.4.2.js" type="text/javascript"></script>

<script type="text/javascript">
$(document).ready(function () {
  $("#DemoButton").click(gapSO);
});

function gapSO(e) {
///<summary>Gets and parses Stack Overflow Points</summary>
  var sourceDiv = $(this);
  var replacementText = "I have ";
  var stackOverflowURL = "http://stackoverflow.com/users/flair/53236.json";
  sourceDiv.html("Loading...");
  $.getJSON(stackOverflowURL, function (data) {
    replacementText += data.reputation + " points and " + data.badgeHtml + " badges on StackOverflow";
    sourceDiv.html(replacementText);
  });
};
</script>
Upgrading to SharePoint 2010: In the field experience
 Last week I was able to upgrade BB&D’s internal intranet site from SharePoint 2007 to SharePoint 2010! So you can properly understand what happened let me cover a little bit about the intranet first. Our intranet is a small deployment, just a single server deployment however it is kept up to date with technology so it is running on SQL Server 2008 with SP1, Windows 2008 R2 on a 64bit virtual machine. We have also not gone with heavy customisation, rather focusing on small tweaks and adjustments. A good example is we do not have a customised master page but rather use the theme options to get the colour scheme we want.
The first step I did was to download the pre-requisites for SharePoint 2010, and using the option on the installer this was a breeze. I’ve seen this before with Dynamics CRM and once again I am impressed by how a very simple feature makes such a big difference. Next step was the install, which was pain less and quick.
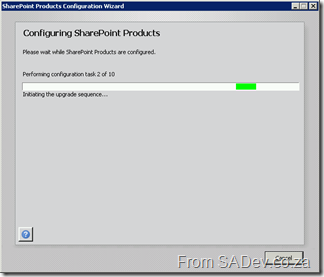
Once installed the configuration manager had to run and this is where I had two issues. The first problem was that I got stuck on task 1! The cause here is that a dialog box had appeared behind the main window (telling me to do the same to all servers in the farm) and won’t go until I clicked OK. This annoying little bug cost me a few minutes.
The second issue was that the SharePoint 2010 install needs to do some Active Directory queries and this meant my user account was not good enough. Not having a good enough user means that the installer produces a very unhelpful error at step 3:
System.ThrowHelper.ThrowKeyNotFoundException()
at System.Collections.Generic.Dictionary`2.get_Item(TKey key)
at Microsoft.SharePoint.Utilities.SPUtility.GetUserPropertyFromAD(SPWebApplication webApplicaiton, String loginName, String propertyName)
at Microsoft.SharePoint.Administration.SPManagedAccount.GetUserAccountControl(String username)
at Microsoft.SharePoint.Administration.SPManagedAccount.Update()
at Microsoft.SharePoint.Administration.SPProcessIdentity.Update()
at Microsoft.SharePoint.Administration.SPApplicationPool.Update()
at Microsoft.SharePoint.Administration.SPProcessIdentity.UpgradeToV4ManagedAccount()
at Microsoft.SharePoint.Administration.SPConfigurationDatabase.ResolveObjectAndClassVersions(SPLog log)
at Microsoft.SharePoint.Upgrade.SPConfigurationDatabaseSequence2.Upgrade()
at Microsoft.SharePoint.Upgrade.SPUpgradeSession.Upgrade(Object o, Boolean bRecurse)
 It took ages to figure this out, mostly because it is not a documented requirement. To get the correct permissions you need to get a domain admin to do the following on the domain controller:
- Open up Active Directory Users and Computer.
- Select Advanced Features from the View menu. Failing to do this means that the tab in step four won’t be visible.
- Right-click the your AD account and select Properties.
- Select the Securities Tab.
- Select Authenticated Users in the Group or user names field.
- Allow Full permissions in the Permissions for Account Operators.
- Repeat this process for any SharePoint service accounts you may have created.
- Next make sure this change replicates to all domain controllers.
- Now connect to your SharePoint server, and open the command prompt (cmd.exe) and type gpupdate /force. This will force the changes to the machine as it may have a cached version.
- Finally reboot the SharePoint server and start the configuration wizard again.
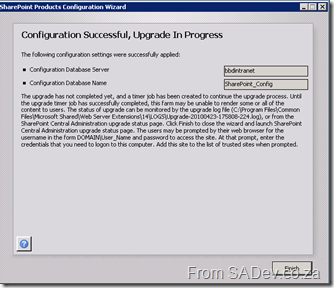
After all that was done the configuration wizard completed and the upgrade process started in central admin. The upgrade process also took a while to do, but once done everything just worked.
Lastly we applied some theme tweaks and a quick run through of testing it and it was done. One thing that is important to remember about this process is that the entire time it was happening the current intranet was done so plan your deployment accordingly. This is easily the best experience I’ve ever had installing or upgrading SharePoint and shows that the product is maturing.
Find Results Tweak - Now with less suck
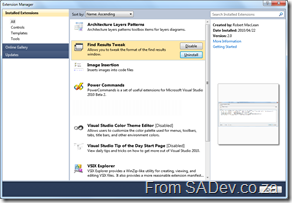 I posted the other day about a Visual Studio add-in which I developed. When developing it, I used the add-in model which has a nasty side effect, it needs to be installed with a MSI. Visual Studio 2010 can also be extended with packages and these can be deployed using the VSIX format.
What is this magical new VSIX format? It is basically a ZIP file which contains everything you need plus a manifest which tells VS how to use it. What makes this much better is that VS handles the install itself, so no MSI is needed. It is also then listed in the Extension Manager and so can take advantage of the features there by being disabled/uninstalled easily, not that you would want to.
A great side effect of this is that the new extension model let me add a little more error handling to the tool to help out debugging it. To get the new version go to http://findresultstweak.codeplex.com
Death of a SharePoint Developer
 I have had to explain many times in the last year why I, a normal developer, am involved with Information Worker which is (mostly) a SharePoint group? I am involved because I believe that the idea of a SharePoint Developer is a fast dying one and soon, people who call themselves a SharePoint Developer will be using it just as a way to justify higher consulting costs more than anything else.
I do not think this is because SharePoint usage is dying, rather the growth (maturity and adoption) of SharePoint is causing SharePoint developers to die off. This is not because SharePoint is so user friendly we no longer need custom code, because we still need custom code in SharePoint. The two reasons for my thinking this is based on two questions, “What SharePoint development really is?” and secondly “What Microsoft is doing about SharePoint development?”.
What is SharePoint development really? In SharePoint versions past (2007 and before) you would develop code for SharePoint using development concepts unique to SharePoint. Now that SharePoint has matured, development of the code for SharePoint involves concepts that are universal to development. There are two examples which come to mind which highlight the maturity of development concepts. First is web parts, which are now the same as ASP.NET web parts, and secondly is web services (and OData if you have SharePoint 2010). Both of these concepts are the exact same as used by many other products made by Microsoft and other companies. For example if you understand how to get data from Twitter, with OData in SharePoint 2010 you will understand how to get data from SharePoint. Yes, you will have some specific bindings/API’s/code that are SharePoint specific but the concepts, which is the difficult part to learn, are the same.
I mentioned two questions and the second is about Microsoft and it’s strategy for SharePoint development, in particular their 2010 strategy (Visual Studio 2010 + SharePoint 2010). A SharePoint developer used to have to go and download special files, install them, fixed issues, try installing again, fix more issues, have special machines or virtual machines to run SharePoint on and so on. The actual process of just writing code for SharePoint meant that you became elite because you had to go through a ritual of fire before you could start. Microsoft have really made SharePoint 2010 development simple and more importantly easy to start with, both by making SharePoint run natively on Windows 7 and also by including everything you need for development within Visual Studio 2010 from day one. It is as hard start wring code for SharePoint now as it is to make a WPF application!
What I am trying to convey is that previously a SharePoint developer had “paid their school fees” by learning so much that was so specific to the process of SharePoint development that they actually had earned a special title. Now that all those barriers have been removed, the title of SharePoint developer no longer applies, we are all just developers now!
Tweaking the Find Results window in Visual Studio 2010
Visual Studio is filled with goodness and happiness and a lot of that is available for tweaking, so you can get the maximum goodness, via the Tool -> Options menu. One of the things which doesn’t have any visible options is the formatting of the way the results are displayed:
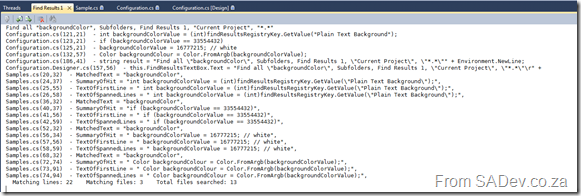
The problem, as indicated above, is a ton of white space, long file paths, no column information etc… Wouldn’t it be great to tweak how that can be displayed? Thankfully Sara Ford found a way to do exactly that via the registry. So you could tweak it to actually display the way you want it!
In my tweaked way it is far more condense with just the filename (no more path), less whitespace (since I am showing only a summary of results) and I also included the column info. The problem is that editing the registry is not user friendly :( This gave me a chance to write my first Visual Studio add-in, which gives you an option inside Visual Studio to set it.
What is really nice is that while you configure the format, the preview window will update and show you how it looks so you do not get any surprises when you save it! If you would like to find out more about it you can go to the site on CodePlex at http://findresultstweak.codeplex.com/


